
Watch the video:
0:00 - Explanation
0:13 - Download Fabric 1.20 server installer
0:30 - Download Fabric 1.20 server
0:59 - Give Fabric 1.20 server more RAM
2:09 - Fix missing Java
2:55 - Accept EULA & Setup server files
3:12 - Install Fabric API
3:40 - Join Fabric 1.20 server
4:20 - Give yourself OP/Admin
4:35 - Letting other people connect to your server
5:28 - Allow Fabric 1.20 Server through Firewall
6:20 - Port forwarding (global friends joining server)
7:05 - Saving and exiting Fabric 1.20 server
Why Fabric 1.20 for a server?
Fabric is a super lightweight modding platform for Minecraft, and the server variant is the same. It allows you to load lightweight mods for super high speed, optimization and more! While most of the mods don’t go as deep as traditional conversion and even total conversion mods for Minecraft Forge, fabric mods are still amazing in their own!
You can take a vanilla server and overhaul it with mods that still add to the vanilla experience without taking it too far into modded territory.
Downloading the Fabric 1.20 server
The download for Fabric 1.20, and even creation of the start.bat file is simplified with their official launcher! The process is made really easy!
Start by downloading the Fabric installer:
After downloading, open it. An installer doesn’t need installing in this case, at least. All you need to do is simply select the Server tab and make sure the latest versions are selected – By default they should be. Oh, and obviously make sure 1.20 is selected for the version!
Click the ... (ellipses) and choose a place to put your server. I put mine on my Desktop\Fabric 1.20
After that, choose Install.

Download Fabric 1.20 server JAR
Now you’ll see a popup that the server is installed, but there’s more steps!
First, click Download server jar and wait for that to complete.

Then, edit the launch command and set -Xmx2G to be the amount of RAM you want to give your server (and can give your server). You can give it as much RAM as you have available, but just remember to leave for other programs on your computer - including Minecraft if you’re choosing to play it on the same computer you’re hosting a server on. That’s fine, just make sure there’s enough RAM to go around, otherwise EVERYTHING may crash…
2G means 2 Gigabytes. You can set this to 6G for example, as in -Xmx6G. You can also use M to show Megabytes instead for more precise measurements. 1G = 1000M.
Finally, Click Generate to generate your server launch files.
Head to your 1.20 Fabric server folder and open start.bat with a text editor like Notepad. Make sure that your RAM actually matches what you set earlier.
Fix missing Java error
This error is cryptic, but the solution is simple: Download Java.
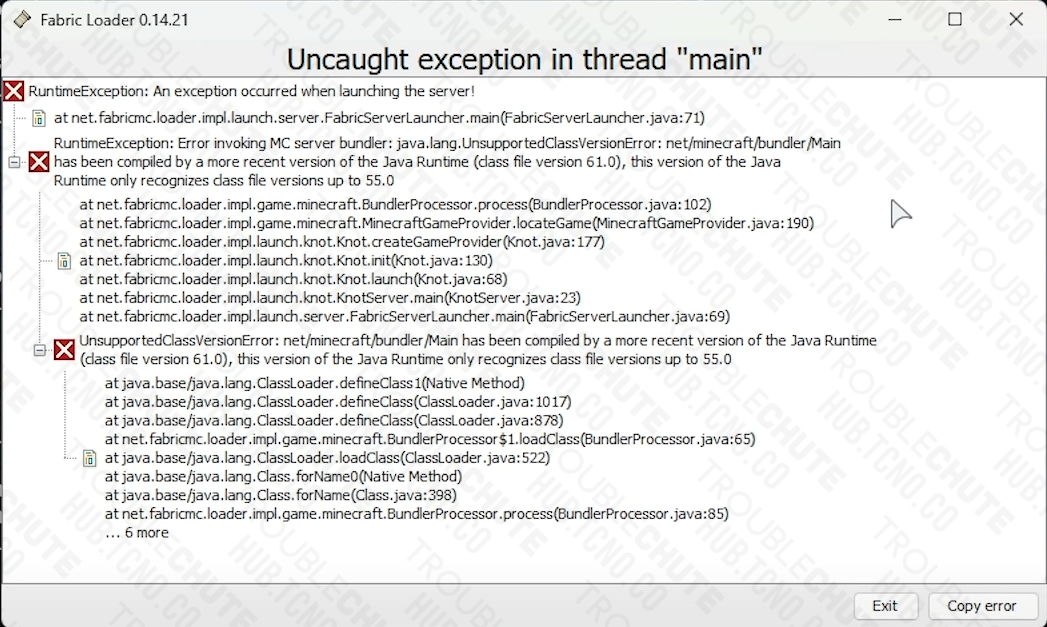
Head to the Java download website and choose Windows, then next to x64 Installer, click the link.
Follow through with the Java installer as you would any other installer, and then you’re ready to start setting up the server.
Fabric 1.20 Server Setup
After double-clicking Start.bat you’ll see a console window popup with server generation information. Eventually it will error out with something about EULA.txt.
You will need to open this EULA.txt file with a text editor like Notepad and change the line eula=false to eula=true.
On top of this, there should now be a mods folder. If there is not, create one. We need to download the Fabric API jar and place it in this folder.
Once the download is complete, move it to this folder.
Launch Fabric 1.20 Server
Finally, you can launch your Fabric 1.20 server and actually connect to it!
On the same computer you’re hosting it on, you can connect to 127.0.0.1, otherwise known as home, or localhost - This other option may work too!
Remember to type op <your username> in the server console to give yourself permission to run /gamemode and other commands as a server admin!
Letting other people connect
The first thing is the firewall. The Windows Firewall, and antivirus software with firewalls or third-party filewalls that listen to the Windows Firewall rules are easy – Others may need a more in-depth Google session to solve.
Usually you’ll open Windows Defender Firewall with Advanced Security, but no more! Here are some simple commands to save you LOTS of clicks.
Open PowerShell as admin by searching for it in your start bar, or open the Terminal as admin, if you have that installed, and then make sure PowerShell appears as the top - otherwise select it from the dropdown.
Now, run the following commands to allow traffic for port 25565 through to your computer:
| |
If you ever wish to remove your Firewall rules for this, run the command: Remove-NetFirewallRule -DisplayName "Minecraft Server"
Now, people on your local network can connect (the same router as you)
For people outside of that, things get a little more advanced
Port Forwarding
This is an often scary sounding topic, but it shouldn’t be.
Simply put: When someone asks for a connection to port 25565 at your internet router’s IP address, they expect to be sent to your computer, but are instead rejected as the router has strong security rules. We need to tell the router that “it’s okay” and “send the traffic to this computer instead”.
That computer may either be your computer, or another router/s between you and the internet access router.
The first step is finding your local IP address. Open Command Prompt or PowerShell and run the command ipconfig. Find the way that you’re connected to the internet through, for example Ethernet or Wi-Fi and look for the IPv4 address. Copy this and keep it in mind. It should be something along the lines of 192.168.x.x.
Head to your routers config page or admin page that you’re connected to. This needs to be the first router after your computer on the way to the internet. If you’re connected straight to a fiber box or something of the sorts then it’s easier and you only have to do this once.
Log in with your administrator credentials. There are often defaults set, and there are far too many brands to cover… So this is up to you.
Heading to the Port Forwarding section, or Application Forwarding section and creating a new application should let you type in ports as well as where to send them to.
You’ll enter port 25565 as well as your local IP address, and select UDP to allow traffic to your computer.
Multiple routers lead to confusion as the furthest router needs to point to the next router, all the way to your computer. When I say ‘furthest’ I mean the one connected to the internet, and ‘closer’ as in the ones in-between you and the internet router connected via Wi-Fi or Ethernet cable in order. This can be a lengthy process with an advanced network setup.
This guide has a simplified explanation of how to port forward:
You can start from 3:30 as we’ve already covered the firewall!
Otherwise, if you have a multi-router network, this guide is for you as well:
Saving and exiting
Because your server runs on your own hardware: It’s free - other than what you paid for your computer hardware, electricity and internet. There are no hosting fees or anything of the kind! The server is free to run for you and your friends – as many as you want to join! You could have hundreds connected to your server assuming your internet and computer are powerful enough.
When everyone’s done having fun and you want to save and close your server, run the following in the server’s console:
save-all
stop
The first command saves everything, and the second brings the server to a gentle stop allowing it time to prepare and save things on it’s way to a safe exit.
Abruptly exiting your server could cause corruption, data loss and worse! It’s always a good idea to run stop, even if you forget to run save-all.
It may not be necessary to run the save command, but I like to make absolutely sure that our progress is saved before stopping and exiting a server.
Have fun
That’s it for setting up your server. Feel free to fill your mods folder with anything, and set it up the way your heart desires.
Everything from here out is on you and whoever you want playing on the server.
