The issue:
The issue was caused by me upgrading from a single Nvidia GeForce GTX 1080 to adding an Nvidia GeForce GTX 1080 Ti.
The issue arose when I realized in MSI Afterburner that the incorrect GPU was being used (GeForce 1080 instead of GeForce 1080 Ti)
To check if your game runs on the correct GPU (Nvidia only), you can check using overclocking software like MSI Afterburner or a monitoring program.
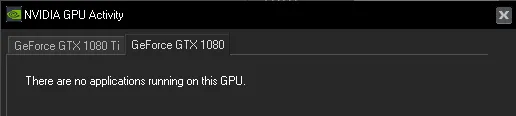
To check EXACTLY what programs are running on what GPU, you can check using the “GPU Activity” available built-in with Nvidia software.
In Nvidia Control Panel, click Desktop and tick “Display GPU Activity Icon in Notification Area.
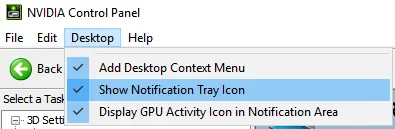
When it is done, you should notice the icon on your taskbar. Clicking on it will bring up the NVIDIA GPU Activity dialog, where you can check exactly what is running on what GPU unit, as seen below.
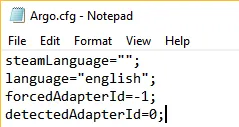
Steps to change the default GPU that Project Argo uses:
- Go to My Documents (or your Documents folder, mine is “D:\Documents”) > Argo.
- Open Argo.cfg
- The fourth line should be “detectedAdapterId=1;” or something similar; the number will likely differ.
- It was on 1 for me, using my GTX 1080 Ti, so I changed it to 0.
- Restart Project Argo and see if it’s working on the correct GPU.
- After editing the file, just save it. As far as I know, there is no need to make the file Read Only like with other games.