
Watch the video:
0:00 - Intro/Explanation
0:23 - Options for playing with friends (No dedicated server)
1:15 - Download V Rising Dedicated Server
1:50 - Edit Start.bat
2:50 - Generating the rest of the files
3:30 - V Rising Dedicated Server Config
4:50 - Configure gameplay options
5:10 - Joining your server
6:00 - Firewall
7:20 - Port Forwarding
9:50 - How is this free?
10:00 - Starting your server
10:30 - Details on server arguments/options
10:59 - Migrate local save to Dedicated Server
12:20 - Joining public server with progress migrated
Which version is the dedicated server?
This guide is made for the V Rising Dedicated Server included on Steam when you purchase the V Rising game.
If you’d like to set everything up using SteamCMD (without needing Steam installed), see the V Rising Dedicated Server guide. The configuration will be similar to this guide, and video.
Keep in mind there is an official “Guide” that takes you through a lot of customization, but doesn’t walk you through a lot of what you’re about to read/watch. I would recommend you open this for further customization once you set up your server. See the official guide - This also details settings and steps for setting up older servers not for 1.0+ like this guide is.
Is this really free?
Yes.
As long as your computer is on, running the server and connected to the internet: People should be able to join you over the internet if you’ve set everything up properly. It’s great.
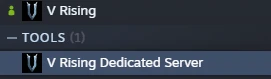
Downloading V Rising Dedicated Server
Open Steam, and search for V Rising. If you own the game you will see V Rising Dedicated Server returned under “Tools”. Otherwise click the dropdown and make sure Tools is ticked, as well as Ready to play is off (This shows everything in your Steam library, not just what’s downloaded).
Preparing to launch server
For this game, you don’t need to do anything special. No launch arguments or anything. All you need to do is click launch, and it should work properly. Do this at least once to generate fee files that we’ll be using later on.
Generating files & Configuring server
Navigate into the Dedicated Server files (Manage > Browse local files) and in here you’ll see start_server_example.bat.
Copy this, and rename the copy to something like start server.bat. The example will update when the game updates, our copy won’t.
Open this file with any text editor.
Make sure to swap out the name of your server from -serverName "My V Rising Server" to something that’s yours, like -serverName "TroubleChute's Server".
For the most part. That’s all the customization we need to do here. We will change the rest of the settings in the server’s config file, such as gameplay customization, ports and more. You can technically enter more commands here, but we won’t as everything is in the config files. Anything you enter here on the command line will overwrite whatever’s in your settings file when the server runs, so just be aware if you do add more to this.
Launching server
Now that we’ve configured everything, you should be able to launch up your server.
Simply click Launch in Steam.
However, we won’t be launching it just yet, as we need to handle a few more things to get other players to join.
Customizing your server
All of your server settings are located in your server’s folder, followed by VRisingServer_Data\StreamingAssets\Settings.
Some settings such as the admin list and more are saved in the path pointed to by the bat file we just edited, as -persistentDataPath .\save-data by default. So the save-data folder contains Settings\adminlist.txt for example.
Most of the game settings are in the first path we mentioned. Let’s get in there.
ServerHostSettings.json contains all of the general server config like the servers name, password, and Rcon (Remote Console - for admin commands). You’ll only really need to swap out the "Name" to match your bat file (even though this isn’t technically necessary), and the "Password". Pay attention to the "Port" and "QueryPort" as we’ll be using those in a bit. Odds are you won’t change these unless you know what you’re doing. If you do, make sure to edit the ports in later commands here.
ServerGameSettings.json contains everything about the gameplay configuration of your server. Everything from "GameModeType" which you can change to PvP or PvE, for example, to "GameDifficulty" and way more. There is too much to detail here, but just remember this file exists if you want to customize your server further.
If you want the server to show on the public list of servers, make sure to set: "ListOnSteam": true, and "ListOnEOS": true,.
Once we’re done customizing, we can get to allowing other players to join our server.
Letting others join your new V Rising server
This is simpler said than done. There are 2 sections and both need to be done to let friends over the internet play.
Open the server to LAN (Others on your local network)
To let someone on the same local network (router) as you play: You need to allow the V Rising server through your firewall.
We need to open ports 9876 and 9877. If you set a custom port above, then forward that.
If you’re using a third-party antivirus with a firewall; you’ll need to look into how to open the ports.
If you’re using Windows Firewall (by default) then run the following commands in an Administrator Powershell window.
| |
If you ever wish to remove your Firewall rules for this, run the command: Remove-NetFirewallRule -DisplayName "V Rising Server"
I have also included 27015 and 27016 which may help your server appear on the public list later.
This will open all of the ports and allow people on the same local network as you to connect to your server while it’s running.
All you need is your local IP address.
To get your local IP:
- Run the following in a terminal/CMD/powershell window:
ipconfig - Find the way you’re connected to the internet, for example
Ethernet adapter Ethernet - Find the
IPv4address and copy it - For example, your local IP is
192.168.1.10
Other devices can use this local IP address to connect to your server. Note: This is a LOCAL IP, and your server is not yet accessible over the internet or even routers outside of your own… That’s where we need to
Port Forward
Using your Local IP address we found above (and allowed ports through to) - We need to send traffic from these two ports to our computer.
If you’re using multiple routers in a chain before your computer reaches your fiber box/access box: You’ll need to port forward each router to the next until you finally port forward to your computer.
Port forwarding varies wildly from router to router, and you can look up guides specifically for your router. Essentially you’ll need to forward ports 9876 and 9877 for both TCP and UDP. If you have an option to choose both TCP/UDP it may be a good idea.
On some routers you can enter ports comma-seperated such as 9876,9877, and even select TCP/UDP instead of needing to create a rule for each type.
Let’s say you have just ONE router between you and the internet (Example: You’re connected directly to the fiber box), you’ll port forward as follows:
- Ports:
9876,9877 - Type:
TCP/UDP - Destination:
192.168.1.10
It may also be a good idea to make sure 27015-27016 are also forwarded for TCP/UDP to help others connect to your server.
Now you’re done port forwarding.
Letting others join
At this point you’ve allowed local traffic and over the internet to reach your V Rising server. All you need to do is let others join by checking the Server Browser in-game, or by getting your external IP address by Google searching “What is my IP”.
Usually it’ll take 5 to 15 minutes for it to show in the public server list, but to join immediately you’ll need to connect using the Direct Connect button on the Join Game page. You will need to do this anyway if you told the server not to show on the public list in the configuration files (It doesn’t show on the list by default).
In the Address and port area you’ll be typing in 127.0.0.1:9876, (9876 being the query port) if you’re connecting on the same computer, you’re hosting the server on.
Otherwise you can enter in the local ip address if it’s on the same network, or the external ip address, if you connect into someone over the Internet.
It all depends on your current setup. When you click OK, it should be added to your list and you can select it followed by connect to launch up your game.
When you get in-game head across to the server browser and you should see it appear at the very top of the star next to it. You’re also able to search for it. This should happen even if your server isn’t registered on the public server list just yet, as we’ve manually added it and favorited it.
Now you can join and play as you like.
Have fun!
