
Watch the video:
0:00 - Explanation
0:12 - Adding a new drive to Hyper-V Virtual Machine
1:05 - Fix possible virtual machine boot loop
2:00 - Activate/Partition new virtual drive
If the time ever arises where you need to add more virtual drives to your VM then this is the guide for you.
Start by opening hyper V on the main menu and do virtual machines. Right-click the VM to which you wish to add a new virtual drive, an existing virtual drive, or a physical one. Then select settings. Head to the SCSI Controller section.
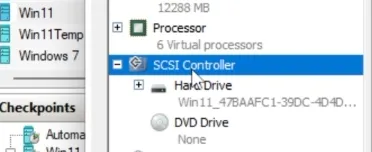
Then select the hard drive and click add. Select the new drive on the left; if it isn’t already selected. Then under Media > Virtual hard disk: click new, assuming you don’t want to add a physical hard disk (If you’re going to do that, you’ll need to make sure that you offline the disk in windows partition manager first).
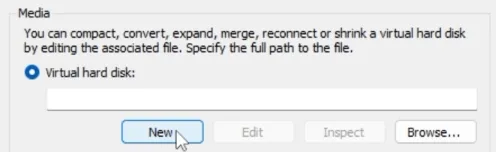
You can choose the drive type from three choices: Fixed size, Dynamically expanding, or Differencing. For simplicity, I’ll be selecting the dynamic option. Click next, enter a name and choose where to save it. You’ll likely want to keep it next to the original virtual machine files. You can, of course, change the maximum size as well. It won’t take anywhere near that amount when it’s created, only a few MB!
Click through the rest of the options and click OK.
IMPORTANT! Before booting the VM, ensure you don’t have Upgrade Configuration Version as an option in the right-click menu for the VM on the list. If you do, you need to click it first. You can, of course, ignore this and continue without it; but if you get your VM stuck in a boot loop, check this guide here: Fix VM Bootloop/Startup loop (Flashing Restarting and Stopping).

Now, you can finally boot into the virtual machine… But there is no drive? Where is it? How do I get it?
It’s simple. Hit Start and enter Create and format hard disk partitions, or “partition manager” – Whatever it’s called on the OS you’re using.
You’ll be asked to select whether the new drive is GPT or MBR on Windows. By default, it’s GPT, so I’ll leave it as is. Then you can select the new Unallocated drive on the list, right-click and select New simple volume...
Click through the setup, leaving the size as the maximum, and when it’s complete, you’ll notice the new drive appear in your file manager.
It’s as simple as that. The last step is where people get stuck. Of course, if you’re like me, you’ll also get stuck in that VM boot loop. Just as well, I had to struggle with it before you!
