
Watch the video:
0:00 - Explanation
0:42 - Download ContextMenuManager
1:22 - Set ContextMenuManager to English
1:46 - Usage/Simple Context Menu cleanup
2:36 - Different locations for context menu
3:35 - What if nothing changes?
3:50 - Other locations
4:50 - Add/Remove items in "New..."
6:55 - Context menu for specific files
7:32 - Easily see which appears from what setting
8:04 - Context menu enhancements
The Context Menu is an integral part of daily life on a computer. You left-click to interact with programs, files, and folders - or right-click for more options. The simple act of right-clicking files and folders on Windows doesn’t sound like a lot, but if you’ve used a computer for a long time, you’ve likely found that it can become cluttered and even take longer to load.
That’s what we’re fixing now.
Thanks to the Couleur Tweak Tips community for bringing this software to my attention.
This guide will show you how to clean up the items in the Windows context menu so it loads faster and you can more easily find what you’re looking for. While it doesn’t touch on repairing a broken context menu (as in it doesn’t appear), this can also be used for it. Find and remove damaged items.
Downloading Windows Context Menu Manager
Head to the GitHub page for Windows Context Menu Manager, then Releases on the right, and download the latest version of the software to get started.

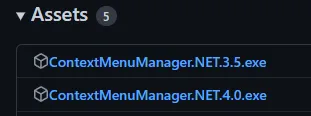
Then from the Assets screen: Select .NET 4 (or the highest number, if different)
There is no installation, simply run the .exe, and it will work. For some computers to work correctly, you must run them as an administrator.
On the first launch, you’ll see a language prompt. Just click Yes and choose English, then click OK. It will then download the English language pack. If it does not automatically restart, simply restart the program yourself.
Using the Windows Context Menu Manager
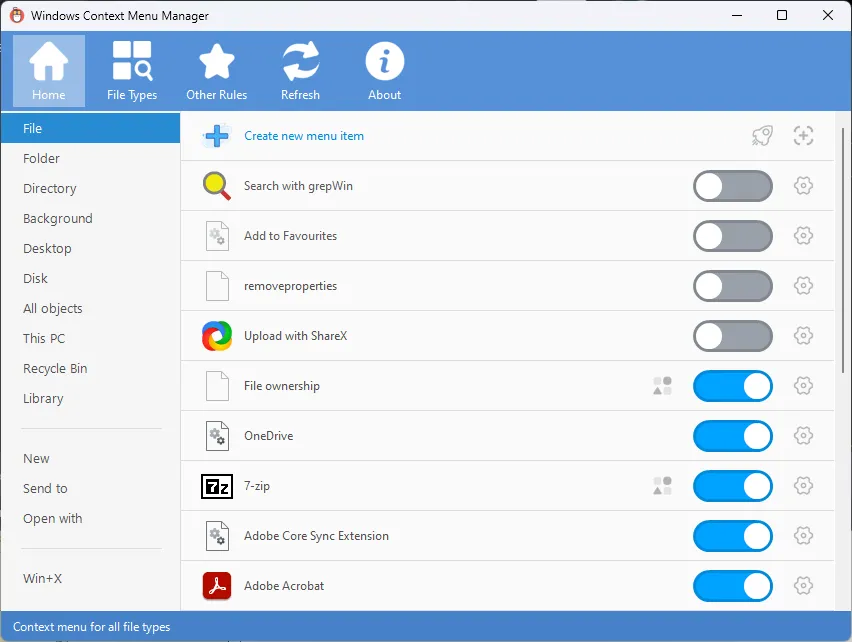
Home heading & General Use
You will find a list of locations you can right-click. Inside each, you will have a list of toggles. Everything that is on will appear when you right-click said item. Right-click on a file, folder, background, desktop, or drive.
The more options you have enabled, the more cluttered the menu will appear and the slower it will load. Some programs are nasty as they slow it down a lot.
You will immediately see the difference for most of these options if you right-click a file, folder (or whatever you’re modifying) before and after toggling a setting. Some will require a restart of Windows Explorer.
Restart the Windows Explorer by:
- A complete restart of your PC
- By changing specific settings that bring up a popup to restart the Windows Explorer
- Open the Task Manager with
Ctrl+Shift+Escape, and locateexplorer.exeon the Processes tab. Right-click and End Task. Then clickFile > Run, and enter “explorer.exe” - Even easier: Right-Click the Desktop and click
Restart Explorer– To enable this go toOther Rules > Menu enhancementsand enable “Restart Explorer” under “Desktop Background”.
You can also create new entries by clicking `Create new menu item, and customize as you see fit. This can be incredibly useful if you have the software you’d like to integrate easily.
The New, Send To, and `Open With`` sections allow you to customize the default dropdowns in the context menu. These often get cluttered just by installing software, and most of the options you’ll never end up using – Microsoft, I’m looking at you. You force me to install the software I’ll never use, just to install Word alone.
File Types heading
This section allows you to customize what happens when you right-click specific file types. For example, You can customize what happens when you right-click on Audio files. You can choose whether you want VLC to have their “Add to playlist” options and more.
This section is powerful but is also the most time demanding. If you have many ideas, you better have the time to match.
The Menu Analysis section allows you to select a file or folder or simply drag one onto the program to see what elements will appear - and why. You can click on options to see why they occur, customize how they do - and turn them off entirely. This is a unique feature that is sure to help you track down pesky issues in your context menu.
Other Rules heading
This section allows you to add some useful features to the context menu. This is especially powerful for developers and other power users on Windows. This is where I’ll enable a few tricks like the Copy Content to Clipboard for files I often need the text from within, take ownership (which is usually a separate program), and get hashes (once again, a seperate program).
Sub-menus
Some items have sub-menus. You can see which ones do, and click to edit by using the little indicator:

Clicking it will reveal a new menu, where you can remove specific items if it’s a dropdown. Unfortunately, most of the options here are not translated.

Duplicates
If you already have software that enables something, and you’d instead use the program to add it: simply disable the old item. For example, I want to use the has button instead of a dropdown. I already have “CRC SHA”, but I don’t remember adding it. It was added with the installation of 7-zip. This short guide shows how to remove it.
Keeping the program
I would recommend keeping the exe around for a while after using it. You may want to bring back something you removed or remove more. It’s not something you install, so it’s nifty to keep it around. Drop it in your Documents folder, or somewhere it won’t be deleted for a while.
This article is a boiled-down version of the video, and you will find a lot of information about the software at the top of this post.
